Website speed is a significant factor for retaining your audience and ranking well on search engines. If you know how to defer parsing of JavaScript, then it helps a great deal in improving your site performance.
There are various procedures to defer parsing of JS script files. Do you want to learn about these steps in detail? If yes, we provide five different methods of delaying the downloading and execution of JavaScript in this blog.
Before we dive into our content, let us learn the basics of JavaScript and why we need to defer its parsing.
What is the Defer Parsing of JavaScript?
JavaScript is a programming line of code that allows you to add interactive, complex elements on your site. Those elements might include animated graphics, maps, video jukeboxes, forms, etc.

We will give you a brief impression of how a website loads before explaining the phenomena of deferring parsing of JavaScript.
The process starts with you typing the URL of a site. This action commands the web browser to load that website on your screen. After that, your browser renders it using the HTML parsing technique.
That browser downloads the file and starts rendering from the top HTML code until it reaches the end.
On the way, if that browser finds a downloadable resource, then it begins the download. It doesn’t stop the HTML parsing while downloading images, videos, or other content.
However, when it gets across a JavaScript code, the browser stops parsing the HTML file. It waits for the JS script files to finish downloading and execution. Only then your browser renders other elements of your site.
Your audience should wait for several seconds to browse your website due to this delay. So, is there a way to load other components of the site before downloading the JavaScript?
Yes, there is. You can defer JavaScript parsing for your website.
The process assigns browsers to download JavaScript code simultaneously while loading other aspects of your site. It will execute the JS script files after loading all other elements of the website.
This way, your audience can browse your website faster without waiting for JavaScript to download. So, defer parsing of JavaScript refers to optimizing the downloading and execution of JS script files to boost site load speed.
Why Do You Need to Defer Parsing of JavaScript?
JavaScripts are often the most massive files to load among all the website elements. Delaying its execution can be an effective way to load your website speed. Your site’s loading time determines a lot of factors regarding your business.
Let us look at some reasons why website load speed matters. With these findings, you will get a clear idea of why you need to defer JavaScript parsing.
1. Slower Page Speed Affects Search Ranking
Google and other search engines evaluate several factors of a website for SERP ranking. Page speed directly influences how your site performs on its evaluation parameters.

Google researches users’ behavior to provide the best experience on its platform. As per their research, more than half of web audiences want a website to load within two seconds.
If your site takes even one second more than that, Google will favor your competitor instead of you.
2. Slower Website Load Time Can Decrease Conversion Rate
If a larger number of your website visitors take an action that will benefit you, your conversion rate increases. However, a slower page can discourage your audience from taking any action.
A delay of even one second in the website’s loading speed decreases the conversion rate by 7%. So, don’t let JavaScript bring you down with a slower load time. Optimize the page speed by deferring its parsing after other HTML codes.
3. Slow Websites Provide Bad User Experience
Slower websites create a terrible user experience. Your audience is always in a rush. Do you want to let them go simply because your JavaScript takes more time to load? No, right?
So, take control of your website’s load speed by delaying the JS script’s execution until the end. This key approach helps you speed up your WordPress site and provide an excellent experience to your visitors.
Online Tools to Identify Non-critical JavasScripts on Your Website
Now you know the importance of delay parsing the JavaScripts, right? It is time to use a few online tools to identify which JavaScripts are critical and not. This information helps you know which JS scripts are slowing down the page speed.
We recommend you test your website on these three online platforms.
1. Google PageSpeed Insights
PageSpeed Insights tool from Google lets you know what aspects of your website are lacking. You also get detailed suggestions on what steps you can take to improve the website speed.
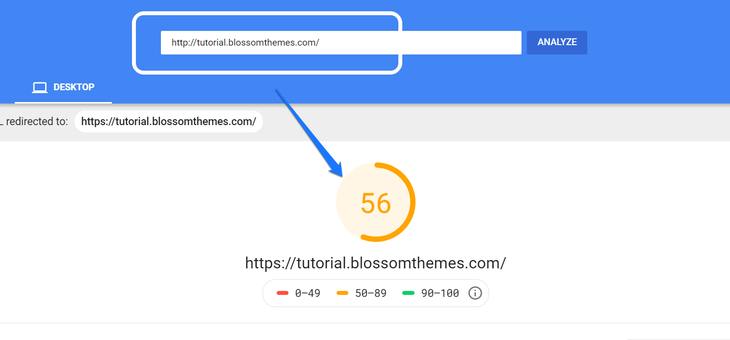
Click on the Analyze button after entering the URL of your website. Google PageSpeed Insights displays the score with different color codes. Red is for low, orange for average, and green for good.
Please scroll down to view suggestions from this tool. Search for the term “Eliminate Render-Blocking Resources” and expand it.
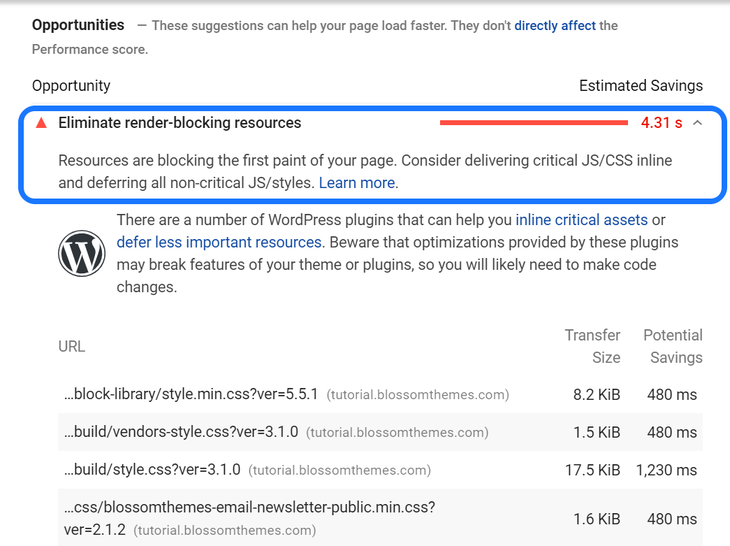
This tool has identified non-critical JavaScripts on your site. It also displays the URL of JS scripts with their transfer size and potential savings. You can follow its instructions and defer all non-critical JS/styles.
2. GTMetrix
GTMetrix is another essential tool for identifying your website performance. Please enter your website URL and wait for it to fetch your site, analyze, and generate results. It displays the test server region that it’s currently using to test your website.
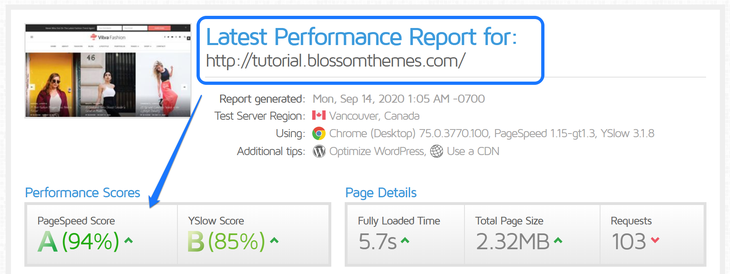
It provides you with PageSpeed score, time taken to load your site, and other insights. You can scroll down to view their recommendations regarding your website. Search for the term “Defer parsing of JavaScript” and click on it.
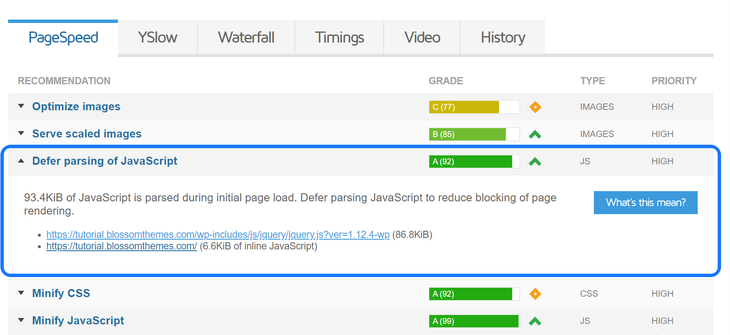
It shows that the browser parses 93.4 KiB of JavaScript while loading our website. GTMetrix also displays the URL of non-critical JS that slows down your website. Also, look at the right side where it mentions the priority for this action.
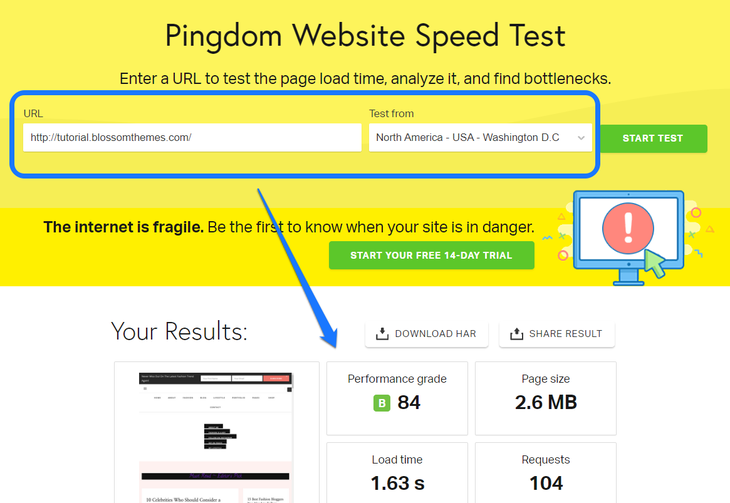
3. Pingdom Website Speed Test
Pingdom is a fantastic website tracking, monitoring, and testing tool. You can select from seven different testing server locations around the world. Please enter your URL at the text box shown below and start the test.
Similar to other website testing tools, it also provides a list of recommendations. Scroll down and observe the suggestions in the Improve Page Performance section. For our website, we advise you to choose ‘Put JavaScript at the bottom.’
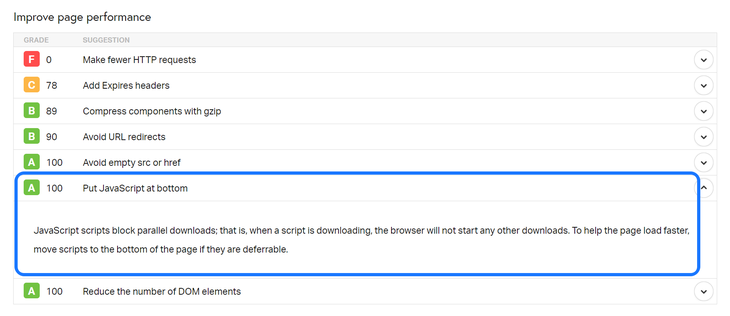
You can follow its guideline and put the JavaScript codes at the bottom of the page. However, deferring these codes is the easiest and most effective method to prevent JS scripts from slowing down the site.
All the online analysis tools that we mentioned above informs you whether JavaScripts are slowing down the website or not. After you find out the issue, it’s time to solve them using diverse approaches.
How to Defer Parsing of JavaScript Using WordPress Plugins?
Several WordPress plugins prevent JavaScripts from delaying your website speed. These extensions help you defer all your non-critical JS codes without manually editing the programming codes.
We will show you a step-by-step process to defer parsing of JavaScript using five WordPress plugins.
1. Defer Parsing of JavaScript with Async JavaScript Plugin
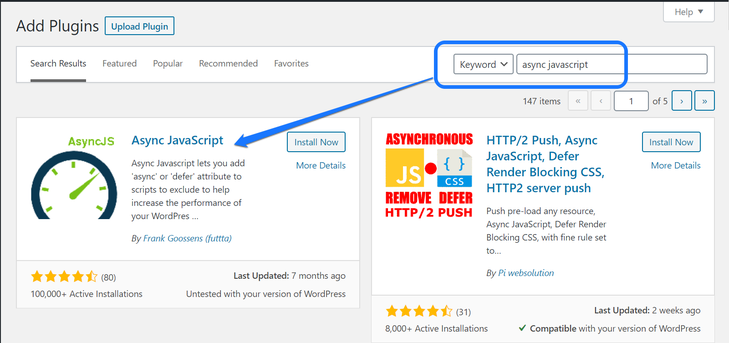
Async JavaScript helps in rendering the above-the-fold content of your website faster in browsers. You can choose between two attributes to add to your non-critical JavaScripts. They are ‘async’ and ‘defer.’
First, let us install the plugin on your WordPress dashboard. Go to the Add Plugins page and insert its keyword in the text box shown below. Select the first option that is uploaded by Frank Goossens (futta).
Go to the Settings page of this plugin after installing and activating it.
The first option that you see here is to enable the Async JavaScript plugin. After you allow it, observe the third section that lets you select a method from two options, async and defer. Choose the ‘defer’ option and scroll down.
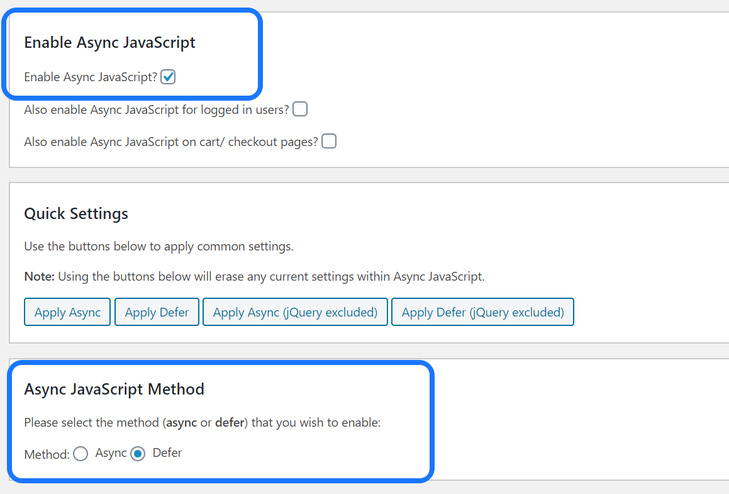
Please scroll down, and you can see two boxes to insert URLs of JavaScripts of your website. The first box is to provide JS codes that you want to defer. In contrast, the second box is for entering URLs that you want to exclude from delaying.

Leave these text boxes blank if you want all JS scripts to defer. Now, scroll down to the bottom of this page and hit the Save Settings button.
2. Defer Parsing of JavaScript with Autoptimize Plugin
Autoptimize is another useful plugin to help you defer parsing of JavaScript. Its other features include aggregating, minifying, caching scripts and styles, and more. Besides, you can also optimize Google fonts and add lazy-loading features for images.
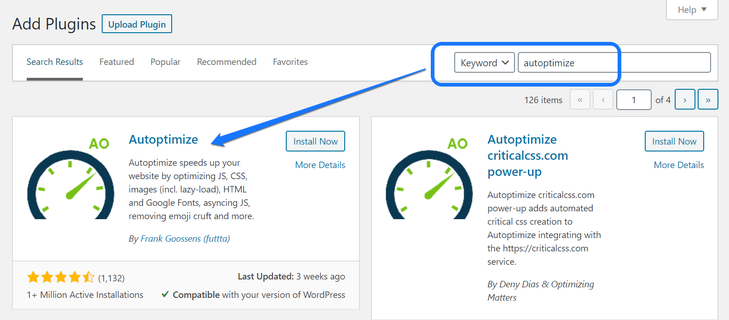
Enter its keyword in the text box at the Add Plugins page’s top-right section on your WordPress dashboard. Install the first option with more than a million action installations and activate it.
Go to the Settings page of the Autoptimize plugin. Please select the JS, CSS & HTML option at the top of this page.
The first section inside this option is to enable the Optimize JavaScript Code feature. Select this feature, and you’ll unlock its settings underneath. It includes Aggregate JS-files, Aggregate inline JS, and more.
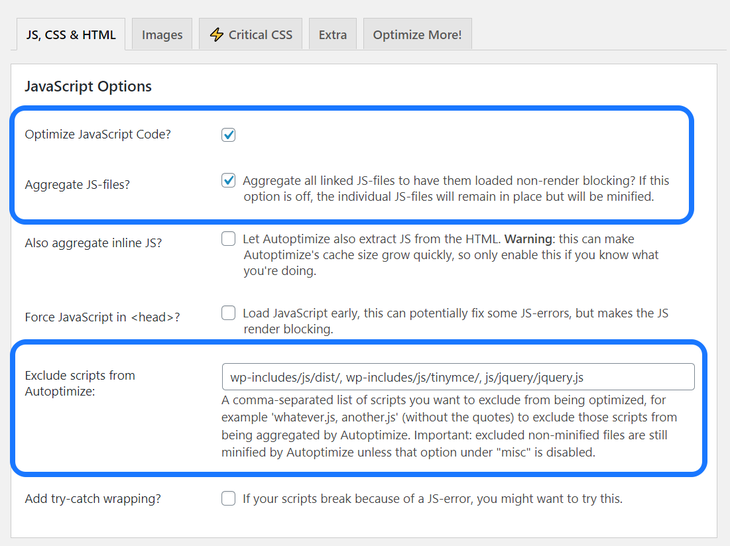
You can select only the Aggregate JS-files and leave the rest options as it is. Additionally, this plugin allows you to exclude JavaScripts for which you don’t want to add the non-render blocking feature.
3. Defer Parsing of JavaScript with Speed Booster Pack Plugin
Speed Booster Pack is a speed-oriented WordPress plugin with a variety of powerful features. You can cache web pages into static HTML files, optimize Google fonts, lazy load images, localize Google Analytics, etc.
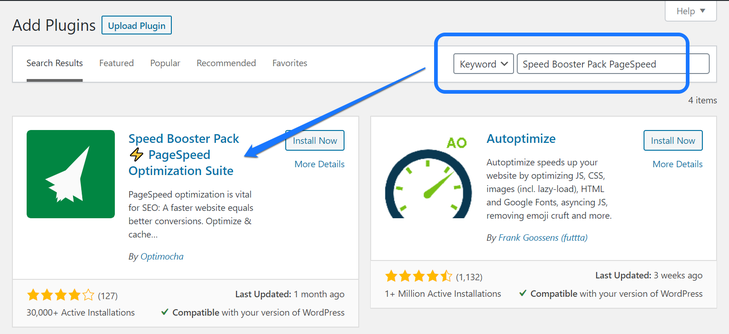
Go to the Add Plugins page in WordPress. Please insert the keyword ‘Speed Booster Pack PageSpeed’ in the text box. Install the first plugin uploaded by Optimocha and activate it.
Now, go to the WordPress sidebar and click on the Speed Booster option. You can see a menu bar with several categories for setting, like Caching, Assets, Special, etc. Please select the Assets category and scroll down.
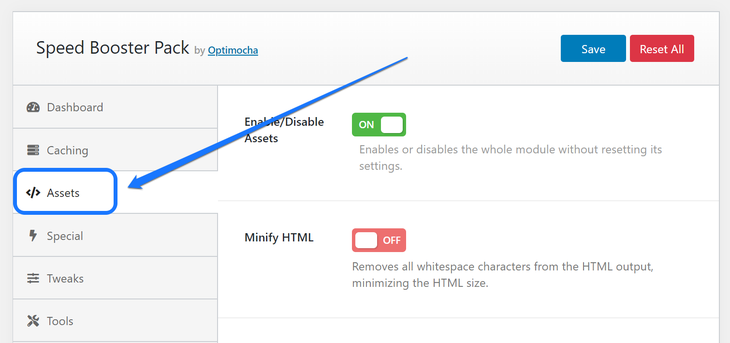
There are two sections to edit the JavaScript of your site. The first section lets you defer the JS scripts or move them to the footer area as an alternative. Besides, you can also enter the JavaScript URLs for which you want to exclude applying these settings.
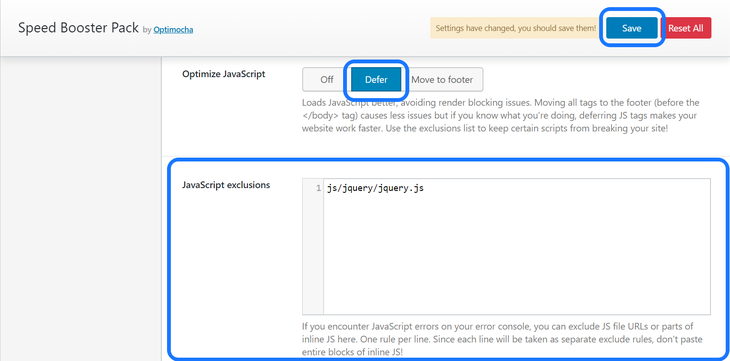
Select the Defer option in the first section. This setting is much more useful than merely moving the JS code to footer. After that, click on the Save button situated at the top-right corner of this page.
4. Defer Parsing of JavaScript with W3 Total Cache Plugin
W3 Total Cache provides a faster website load speed that helps you to provide better user experience. It includes several powerful features, such as the Content Delivery Network (CDN) integration.
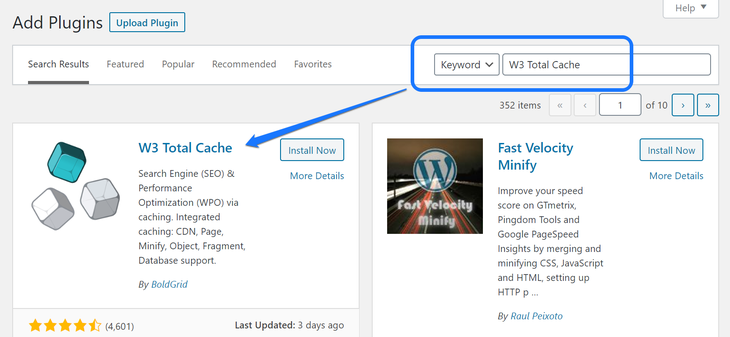
You have to visit the Add Plugins page to install this plugin. Insert the keyword “W3 Total Cache” in the text box at the top-right side. Select the first option that has the publisher’s name as BoldGrid.
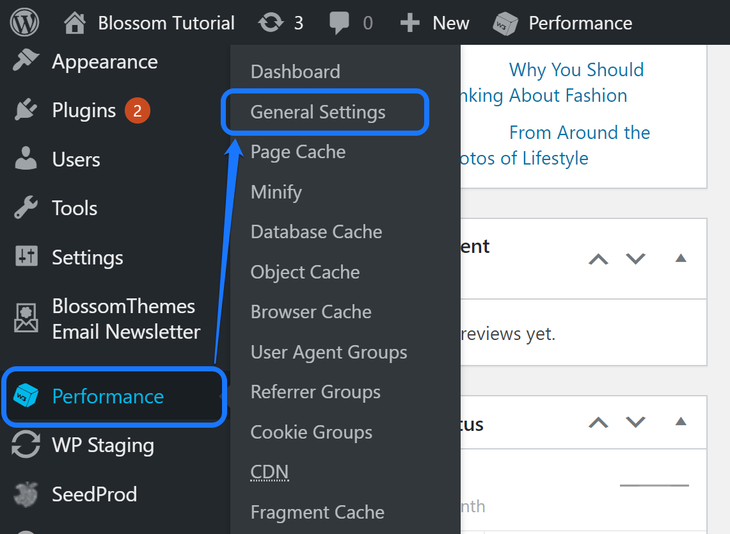
After you install and activate this WordPress plugin, click on the Performance icon at its left sidebar. You see a drop-down menu with several buttons. Select the General Settings button to proceed.
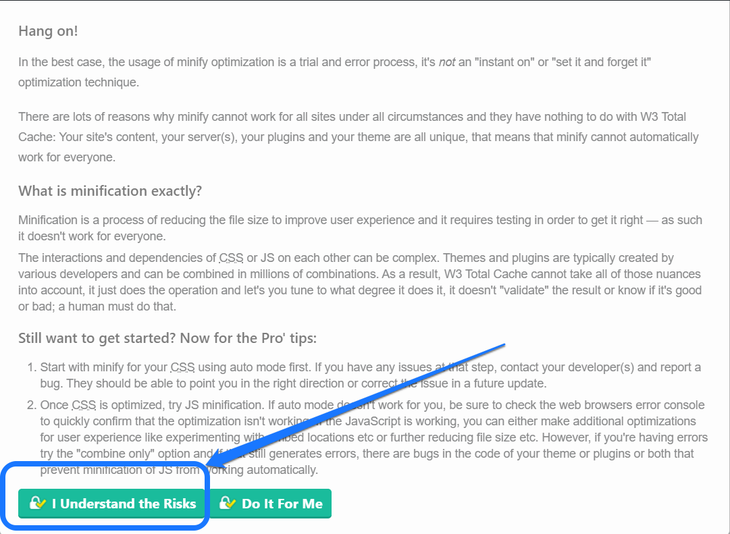
Scroll down in the General Settings page till you see the Minify header. Select the Enable option and you get a dialogue box with few instructions. Read them all and select the “I Understand the Risks” button.
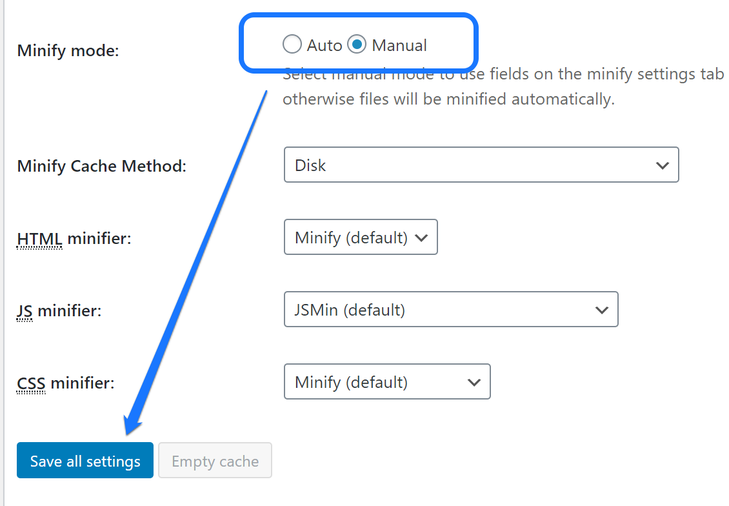
After that, you can see two options for Minify mode: Auto and Manual. Select the Manual option to specify files to be minified. At the end of this section, you see a Save all Settings button. Click on it to save the changes.
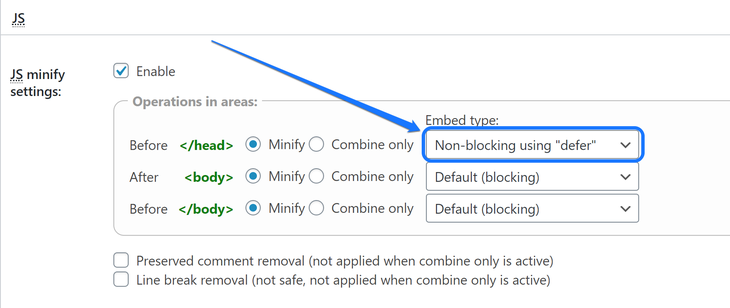
Go to the Minify page by clicking on its button inside the Performance option. Now, scroll down till you see the JS heading. You can see the Operation Areas section with three HTML tags.
Select Non-blocking using the “defer” option inside the embed type of the Before </head> tag.
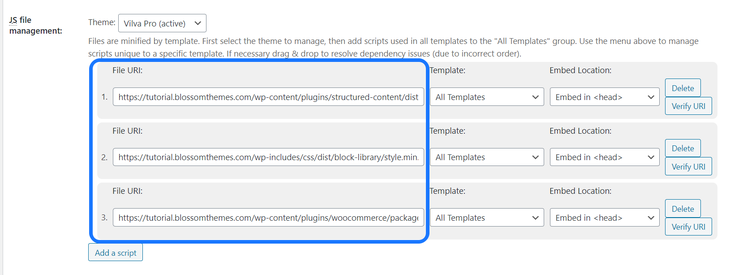
Right below this section you will see the JS file management heading. You need to select the active theme from its drop-down menu and click on “Add a Script” button. WordPress provides you a text box to include the URI of JavaScript which you want to parse.
If you want to add more than one then click on the “Add a Script” button once again. Add the URIs for all the JS scripts that are suggested by online speed checking tools, like Google SpeedInsight, GTmetrix, and more.
Click on the “Save Settings & Purge Caches” after making changes. After this action, scroll down to the CSS section. You will see a “Add a style sheet” button under the CSS file management header.
Insert the CSS stylesheet URIs in the text boxes provided in this section.
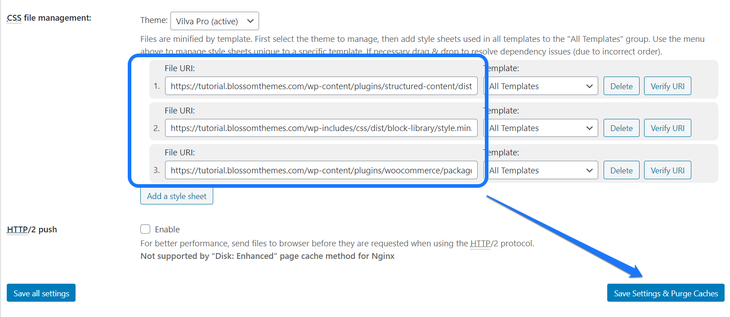
You can add more than one based on the suggestion provided by online speed checking tools. Click on the “Save Settings & Purge Caches” button after making changes in the CSS section.
5. Defer Parsing of JavaScript with WP Rocket Plugin
WP Rocket is an excellent WordPress plugin to boost your website load speed. You get page caching, cache preloading, static files compression, and other powerful features. It has a minimal configuration and developer friendly codes.
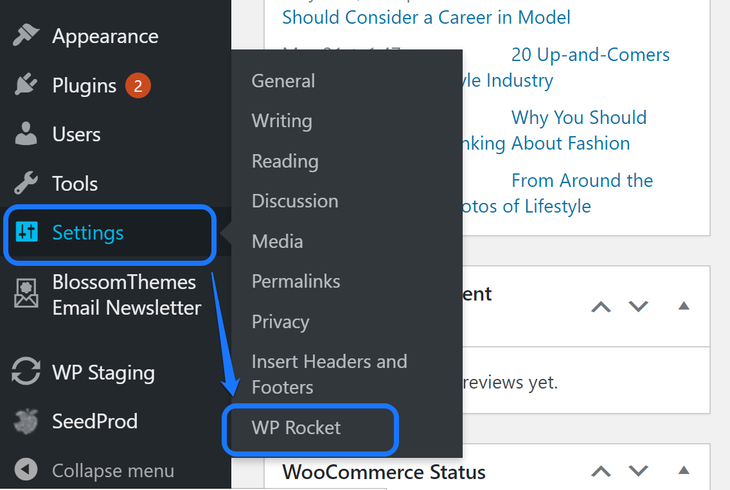
Once you purchase and install this plugin on your website, log in to your WordPress dashboard. Click on the Settings option in the left sidebar. Select the WP Rocket option inside its drop-down menu.
You enter WP Rocket’s Dashboard which includes multiple tabs at the left side. Select the third tag, File Optimization, from that menu. It lets you optimize CSS and JavaScript files.
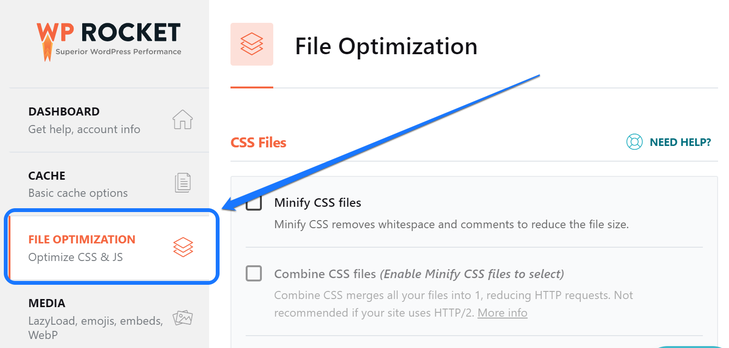
The first section in this page is for CSS files. Scroll down to the second one which is for the JavaScript files. Select the “Load JavaScript deferred” option. After that, you get an option to enable/disable the Safe Mode.
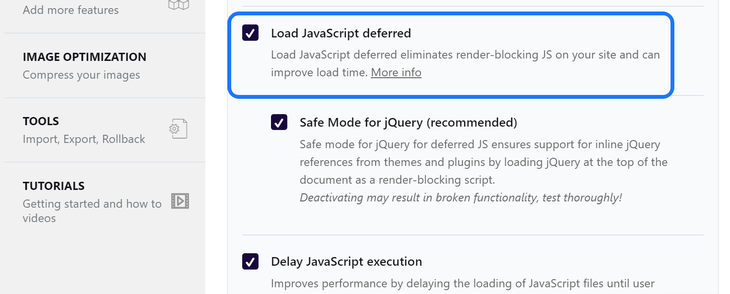
We recommend you to turn the Safe Mode on. When you complete making these updates, scroll down further till the end of the page. Click on the Save Changes button and test your website’s performance on online speed testing tools.
How to Defer Parsing of JavaScript in WordPress by Coding?
Are you familiar with the HTML and PHP codes? If yes, then we provide you another approach to defer parsing of your JS script. Here are two different methods of coding for achieving the same result.
1. Defer Parsing of JavaScript Using Functions.php File.
Functions.php file is crucial for controlling how your website operates. Before you make any changes to it, make sure you create a child theme of your existing WordPress theme.
Additionally, take multiple backups of your site before making any changes. Even a single mistake, like punctuation errors, can break your website. If you are wondering how to create a backup of your website then there are two options.
The first option includes the cPanel backup tool. However, this tool works only when your content size is less than 10GB. Another approach is to manually create a backup file by downloading the database of your site.
Moving on, you have to insert a code snippet in the Functions.php file to defer parsing of JavaScript. Make sure you copy the entire code that we provide and not make any changes to it. Here are the programming lines of code that you have to copy.
function defer_parsing_js($url) {
//Add the files to exclude from defer. Add jquery.js by default
   	 $exclude_files = array('jquery.js');
//Bypass JS defer for logged in users
   	 if (!is_user_logged_in()) {
        	if (false === strpos($url, '.js')) {
            	return $url;
     	   }
       	 foreach ($exclude_files as $file) {
           	 if (strpos($url, $file)) {
              	  return $url;
           	 }
      	  }
 	   } else {
   	     return $url;
 	   }
  	  return "$url' defer='defer";
}
add_filter('clean_url', 'defer_parsing_js', 11, 1);
Log in to the WordPress dashboard and search for the Appearance option in its sidebar. Please hover your mouse over it and click on the Theme Editor button at its drop-down menu.
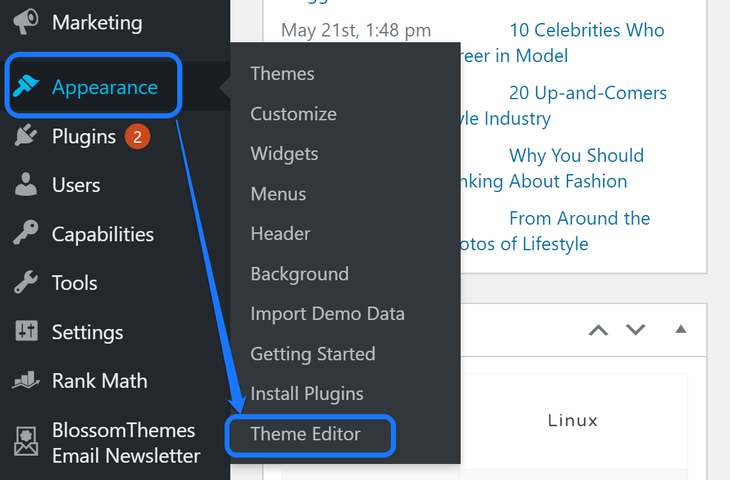
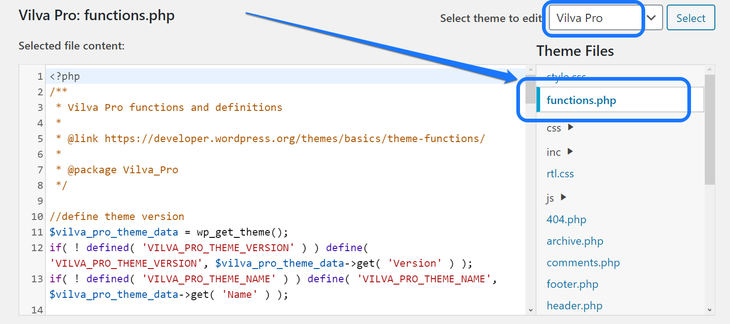
You enter the Edit Themes page with this action. Look at the top-right side that allows you to select one of your installed WordPress themes. There is a sidebar below that option. Click on the functions.php button from that sidebar.
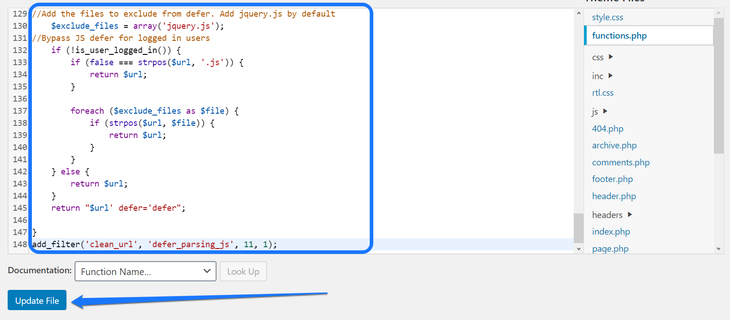
Go to the last line of programming code in the functions.php file. Now paste the code snippet that you copied earlier at the end of this file. Click on the Update File option after pasting the code.
We have used the Defer attribute in the above code snippet. You can change it to Async, which parses the JavaScript asynchronously. However, the Defer attribute is the best option to speed up your slowing website.
2. Defer Parsing of JavaScript Using HTML Script Method.
Another way to delay the parsing of JavaScript is to paste an HTML code right below the </body> tag. Similar to the previous step, we provide you a code snippet that you have to copy.
However, you have to tweak that code snippet a bit before saving the update. Here is the code that you have to copy. Change the texts “defer1.js”, “defer2.js,” and “defer3.js” with the JavaScripts of your websites that you’re aiming to defer.
< script type="text/javascript">
function parseJSAtOnload() {
var links = ["defer1.js", "defer2.html", "defer3.js"],
headElement = document.getElementsByTagName("head")[0],
linkElement, i;
for (i = 0; i < links.length; i++) {
linkElement = document.createElement("script");
linkElement.src = links[i];
headElement.appendChild(linkElement);
}
}
if (window.addEventListener)
window.addEventListener("load", parseJSAtOnload, false);
else if (window.attachEvent)
window.attachEvent("onload", parseJSAtOnload);
else window.onload = parseJSAtOnload;
Now you have to paste this code in the footer area of your website. Instead of going with the risky approach of manually editing the HTML code, we will use a WordPress plugin.
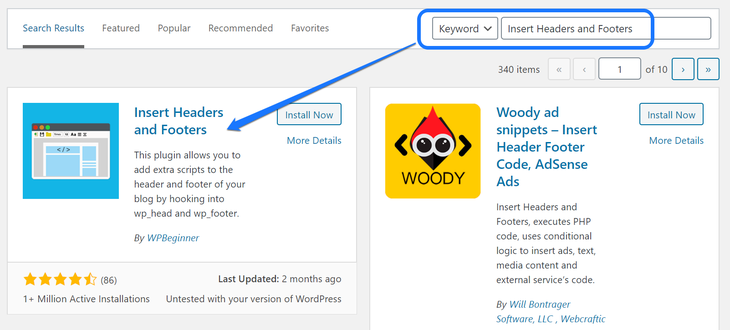
The Insert Headers and Footers plugin helps you insert codes, such as Google Analytics, Custom CSS, JQuery, JS script files, etc. As the name suggests, you can add these codes to both the header and footer area of your WordPress site.
Please go to the Add Plugins page of your WordPress dashboard. Enter the keyword of this plugin in the top-right text box. Install and activate the Insert Headers and Footers plugin, whose owner’s name is WPBeginner.
After installing, you have to visit its Settings page. You can see three different text boxes on this page. Insert the code that you copied earlier in the last box with the title ‘Scripts in Footer.’ Check the screenshot below for illustration.
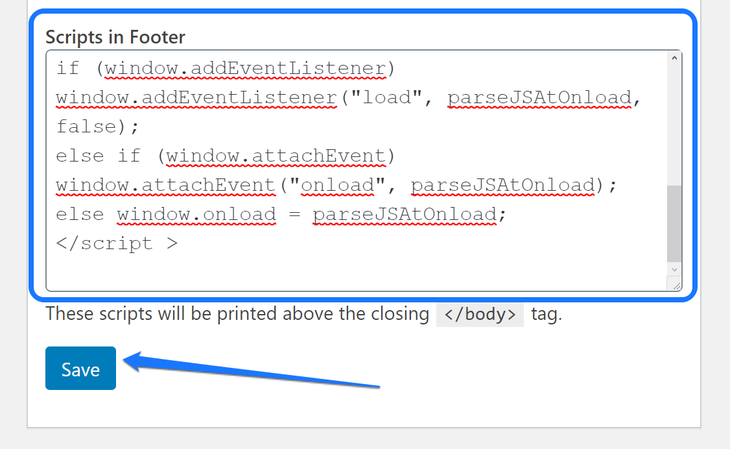
Click on the Save button after you’ve pasted the code in the text box displayed above. This action automatically adds the code snippet above the </body> tag in your website’s HTML file.
FAQs (Frequently Asked Questions) About Defer Parsing of JavaScript
How to tell if you need to defer parsing of WordPress?
The best method of finding this out is by looking at the results in online website performance testing tools. Some examples include GT Metrix, Google PageSpeed Insight, and Pingdom Website Speed Test.
What is the difference between JavaScript Defer and Async Attributes?
There are two HTML attributes that you can use to prevent JavaScripts from delaying your website speed. The first one is the Defer, and another is Async.
Defer attribute downloads the JS script files simultaneously while your browser parses the HTML file. It executes that JavaScript file only after rendering other elements of your website.
Async attribute also downloads the JavaScript simultaneously while parsing other HTML elements. However, with this feature, your browser executes that file immediately after the download completes.
Q. What is the difference between JavaScript Defer and Async Attributes?
A. There are two HTML attributes that you can use to prevent JavaScripts from delaying your website speed. The first one is the Defer, and another is Async.
Defer attribute downloads the JS script files simultaneously while your browser parses the HTML file. It executes that JavaScript file only after rendering other elements of your website.
Async attribute also downloads the JavaScript simultaneously while parsing other HTML elements. However, with this feature, your browser executes that file immediately after the download completes.
Here is a video to absorb more information about these two topics.
Video URL: https://www.youtube.com/watch?v=BMuFBYw91UQ
Q. How do I remove render-blocking JavaScripts from my website?
A. The best approach to removing the unnecessary JavaScripts is to defer its parsing before other website elements. Another strategy is to minimize the unnecessary JS scripts that don’t add any value to your site. We also suggest you try concatenating both the JavaScripts and CSS together.
Wrapping Up!
Which method did you find the most effective? We recommend you to defer parsing of JavaScript using WordPress plugins as the first option. Only move to the coding approach if the plugins could not give a better result.
We hope our content was an incredible source of information for you. Please share this blog with your colleagues so they can take care of their unnecessary JavaScripts as well.
Also, mention your feedback in the comment section below!

